Sunday, February 26, 2012

Graphic 45 Design Team 2012 Audition

I am so excited to share with you my project submissions for the 2012 Graphic 45 Design Team Audition.  Graphic 45 is such an amazing company and it would be just unbelievable to create with and promote their products. Below are the projects I have created. As always, I will explain products used and techniques completed along with detailed photos. Please be sure to leave me a comment if you have any questions because I would LOVE to answer them for you.

First up is an easel tag made from the Graphic 45 Magic of Oz collection.


The paper on the background is from the Magic of Oz collection as well as the poppy flowers and the Dorothy cutout. The stamped sentiment at the top is from the Hampton Arts stamp set that go along with the paper collection. I used black embossing powder on the sentiment to create a glossy look. The image of the hot air balloon is stamped from a My Favorite Things stamp set onto a piece of patterned paper from the G45 collection. The bundle of embellishments at the bottom left hand corner are a mixture of I Am Roses flowers and a Word Key from Tim Holtz.  


When you lift the tag to make the easel you will see that I made a faux yellow brick road. I used Fragments from Tim Holtz and a gold color card stock. Before I glued the fragments I edged each one with Espresso Alcohol ink to create a worn look. 

The next project up is a card. I used the G45 Hallowe'en in Wonderland collection. These images are phenomenal! 


I layered a piece of orange card stock with a sheet of patterned paper from the collection. I then cut an image from the paper and layered it on some navy card stock. I used the banners die from Tim Holtz and stamped onto it a Halloween sentiment from Recollections. I sprayed some ivory seam binding with Black Magic Tattered Angels Glimmer Mist and crinkled it to create a distressed look.  I then tied a small teapot charm onto it before making a bow. On the right hand corner I used several different flower dies to create  flowers which match the paper line. The one on the furthest right is made of Tim Holtz Pine Cone die. The other flower dies are from My Favorite Things. One being the scalloped rolled flower and the other is just a rolled rose. I used a couple sprays in the background of the embellishment grouping. The navy colored one is just from my local hobby store and the orange one is a wheat spray from MB's Treasurista. I LOVE those sprays. 


The inside of the card is simple yet fitting. I layered the orange card base with a deep purple cardstock. I cut out the labels using My Favorite Things Layered Labels die-namic and stamped the sentiment from a Red Lead Halloween stamp set. The bottom scalloped border is cut from patterned paper and layered with a custom made pleated crushed velvet ribbon.

Third project I have created is the G45 Christmas Emporium Altered Photo Tray. This is the only project that I used from previously made projects for this DT submissions. The others were all made this past weekend.


For this tray I cut out background images from the Christmas Emporium paper collection.  I altered each section a tad bit differently. I primarily used I Am Roses flowers on this tray with some Tim Holtz idea-ology pieces mixed in.


I fussy cut several of the images from the paper collection because they were gorgeous and accented them on the photo tray.

Moving on, I have created an Altered Frame using the G45 Steampunk Debutante paper collection. I was and still am obsessed with this paper collection. When I first bought this I didn't want to cut it because I was so in love with it but now It makes me so inspired it's a go to collection.


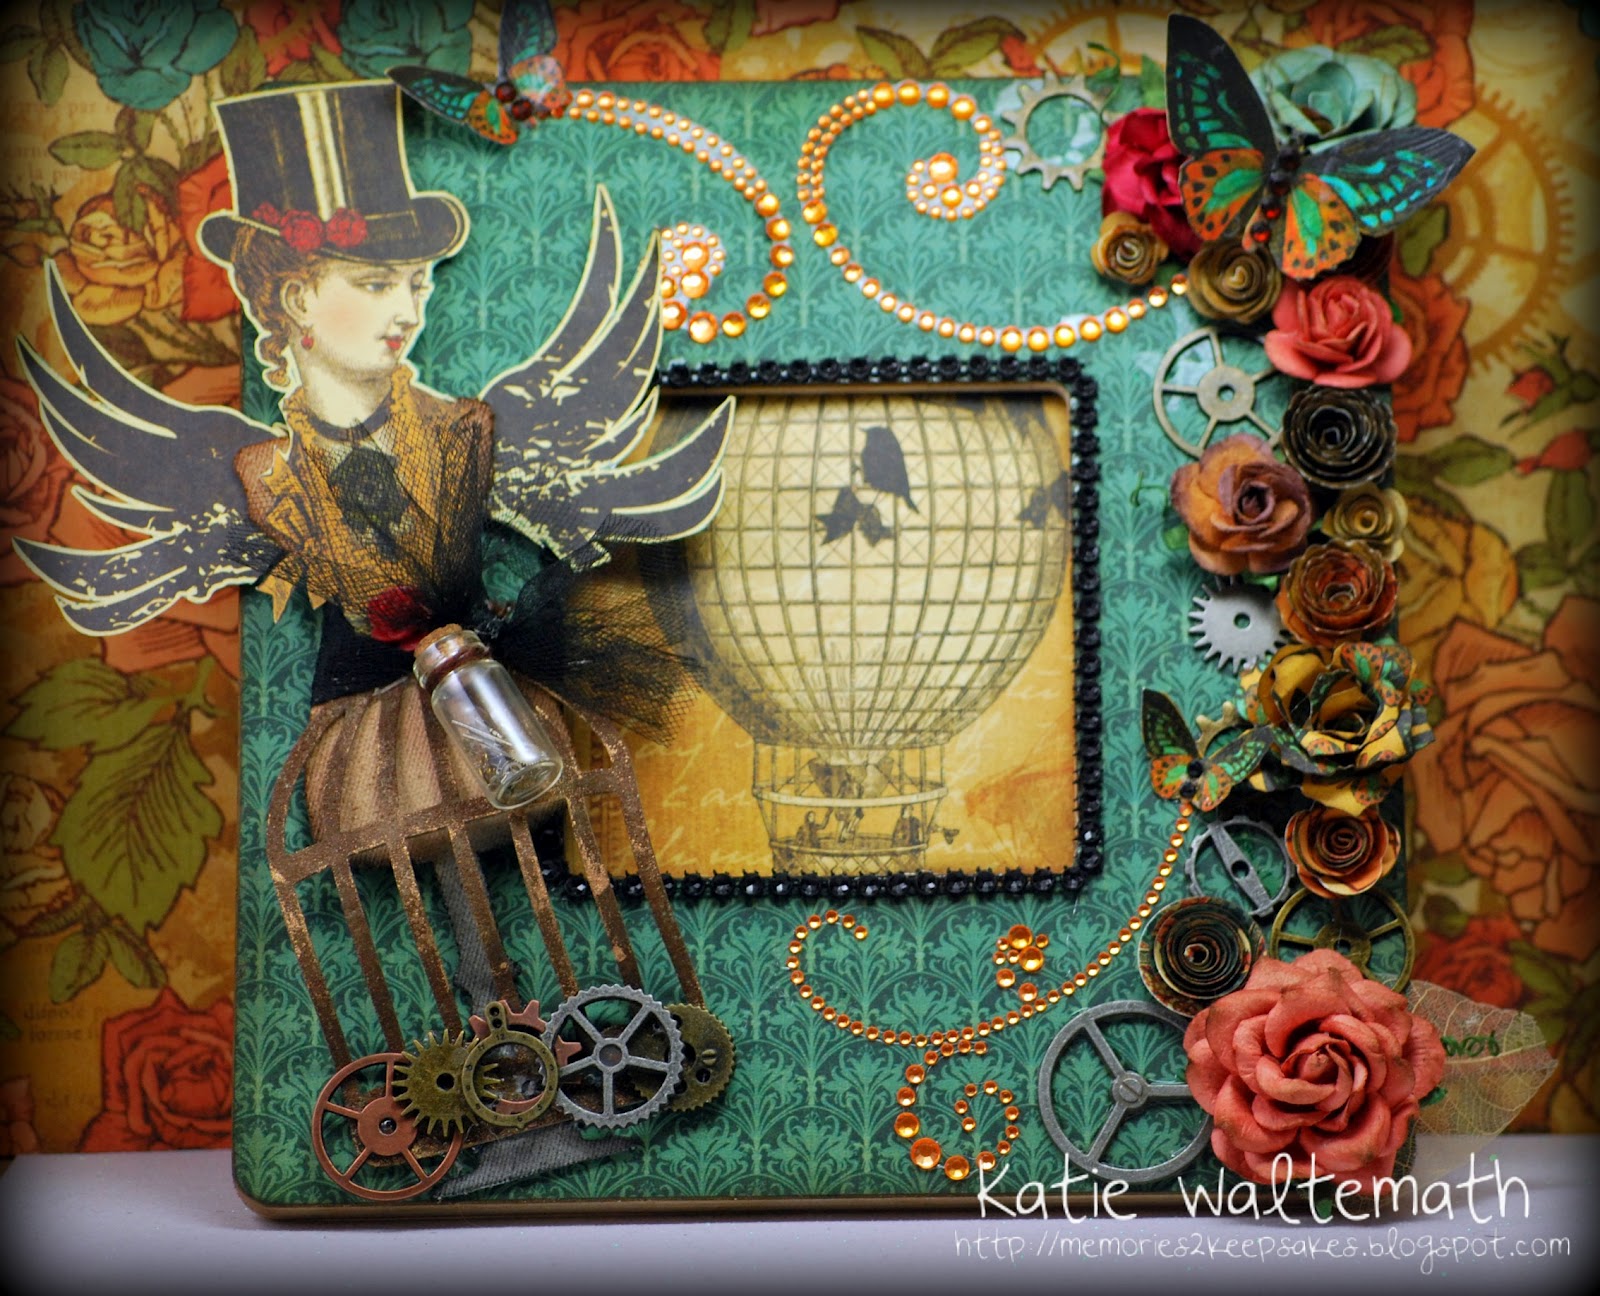
I really do enjoy the look of this frame tremendously. 


 I used am image from the collection and adhered it to a canvas cut out from he Tim Holtz Sewing Room Dress Form Die. For the skirt I used the Tim Holtz Birdcage Die which I cut out using grungboard and then embossed with vintage photo distress embossing powder. After it completely cooled I inked it with Black Soot and Walnut Stain Distress ink and then went over the skirt in spots with Gold Rub 'n' Buff paint. I adhered different gears and sprockets to the bottom of the skirt and tied a tule bow with a vile of watch parts attached.


Along the entire right hand side of the frame I created a flow of flowers and gears to capture the "Steampunk Style." I used a couple MFT scalloped flowers, rolled roses and rolled flowers as well as the Tim Holtz Pine cone flowers. I fussy cut a couple butterflies from the patterned paper and added orange bling as their trails. In the center of the frame placed an image from the paper collection and edged the frame in Black Mesh Bling from MB's Treasuristas.

This next project was one of my favorite to make this weekend. I JUST picked up the paper collection Olde Curiosity Shoppe on Friday and was so thankful I did! WOW! It's fabulous! I've been wanting to make an altered clock for some time so here it is:


I took apart a wooden clock so that I could alter it and boy was it a blast! I used a pattered paper from the collection as the background. For the numbers I fussy cut out numbers of all different sizes from both the 12X12 and the 8X8 pack to have differing sizes. After they were all cut out I adhered them to a piece of teal card stock and then cut them out again! ;) I wanted them to have the layered look. I used pop dots to raise them up a little. For the clock hands I adhered peacock feathers to it to make those now the hands. I LOVED how that turned out. I was concerned the clock wouldn't be functional if I added too much but I think I found the perfect balance. You will also notice that I fussy cut the flying pig images and placed them onto some coiled wire mimicking them flying.


I cut some of the Apothecary bottles from the paper collection and used pop dots to add some depth.


Here I cut out the vintage boot with peacock feathers sticking out of it and added some of my own feathers as well. I added a black and white polka dot feather, a light blue small feather and then varying lengths of thin peacock feathers. To the right of the boot you will see a altered Tim Holtz pocket watch. I cut one of the tiny flying pigs and two apothecary bottles out and placed them inside the watch. I used an ivory lace trim from MBT all the way around the clock for a finished look.

Last, but certainly not least is my final project. This project took me hours to create but I just couldn't stop. There were times I doubted whether or not it would look as I imagined. I am so glad I finished this one! 


Using the G45 Once Upon a Springtime paper collection, over 100 wooden spools and many many glue sticks here you have the final product. An altered wooden spool wreath. I can't explain the love I have for this wreath. I individually cut, inked and glued each and every spool from large to tiny on this wreath. Once all the spools were created I just began gluing them on in no particular order. 


I altered a small bird house with the paper collection as well. I used some natural moss around the bottom and the opening of the bird house. I then hung the birdhouse from the center of the wreath.

Here are a couple close ups of the spools:


What an amazing experience this has been. Graphic 45, thank you for taking the time to view my submissions as well as offering your product to an amazing design team.  Also, thank you for making such inspiring products to create with. Your papers more than any others help me to produce my best pieces of work and I tremendously appreciate that.

XoXo,

Katie Waltemath

Saturday, February 25, 2012

MBT Sneak Peek Sunday

Welcome to Sneak Peek Sunday for MB's Treasuristas! 


This is a new blog hop the designers for MB's Treasurista will showcase what new products will be in Misty's Zibbet store on the 1st of each month. For this month's Sneak Peek Sunday I made a card to show some of the new products to be released. Take a look!


This card turned out super adorable. I used a VERY simple card base instead of layering the front. I colored up the new TGF Simply Anya using a variety of Copics. I used some very tiny pearls to give Anya some earrings. I popped her up on the MFT Decorative Doily Oval die-namics which I cut out of the My Minds Eye Miss Caroline Dolled Up paper collection. In the left hand corner you will see a collection of I Am Roses flowers and some AMAZING new acrylic wheat sprays. The sprays blow my mind because they are so gorgeous. See a closer look below. 


Isn't she very cute! 


Wow.... look at those sprays They are called 3-Tone Wheat Leaves and come in a wide variety of colors including apple green (pictured), orange, red (pictured), turquoise, pink and salmon. You will also see the   round pearl/bead spray in livory that I just cut and bent over to create loops as an accent piece. The lace across the bottom is Ivory Double Scallop Lace in cream.  Also, the layered trim on top is called Picot Gimp Trim and comes in several colors including pink/cream, white, lavender/cream, light pink/cream, light taupe/cream (pictured) and light blue/cream.


The sentiment on the inside is from the MFT Pearls of Wisdom stamp set. I just loved how it related to the stamped sentiment on the front of the card. The embossed sentiment on the front is from MFT as well. I then stamped the inside sentiment on a piece of raspberry cardstock and used the Well Worn Greetings Die-Namic set from MFT.

Please check out MB's Treasurista HERE for the new items on March 1st!

Also be sure to stop by the other amazingly talented designers to see how they showcase the new products and to see other new items Misty will have for sale! 


Thanks for stopping by!


Wednesday, February 22, 2012

Quick Share...

I just wanted to share with you two new cards I created this evening. The first one I used the My Favorite Things Weekly Sketch as layout of the card. This layout was very simple yet classy still. A good friend of mine asked me to make a card for her boyfriend. Just a simple "I love you" card. This is what I came up with:


I find it VERY difficult to not put flowers on a card! ;) But, with that said I really do like how this card turned out. 


This sentiment is from the MFT Clearly Sentimental About Romance collection. To me, this sentiment speaks volumes and I thought it was perfect for this card. 


The next card was to be made for a 4 year old girls birthday. I LOVE MFT Flopsey but I didn't have one that I could use for a birthday. So, I adapted the I Need Coffee Flopsey to make it useful for a birthday. I simple cut out the coffee cup and put in the balloons. Take a look:


Well, I do hope you liked what I had to share today and will come back to see me soon! Do I have some AMAZING projects to share with you later this week! 

XoXo,

Katie

Monday, February 20, 2012

February MB's Treasurista Design Team Project

Hello Creative Minds! I wanted to share my February MBT Design Team project. I made a card for my best friend for her birthday and used lots of Misty's new products. Here is the card:


To make this card I used a teal card base and layered on some magenta colored cardstock. I used patterned paper from the My Minds Eye Lime Twist Happy Go Lucky paper collection for both the background paper as well as the paper pieced My Favorite Things stamped image. 


Check out all of Misty's new products in the corner of this card. There are the small pink organza butterflies, the acrylic and organza flowers, the pink mini acrylic flowers, black mesh bling and the stick pin and bead cap. Look at all the YUMMY new items in Misty's shop HERE!


I stamped the image using Memento Tuxedo Black ink and colored the hair, skin and cupcake of the MFT a La Mode Birthday Girl stamp. I paper pieced the dress and cupcake wrapper from the MME paper collection. 


Here is the inside of the card! Sorry, I totally was excited about writing on the inside of the card that I totally forgot to take the pics first! :P 

I hope you will check out Misty's new products!!

XoXo,

Katie


Saturday, February 18, 2012

MB's Treasurista St. Patrick's Day Blog Hop

HELLO!!!! Thank you so much for stopping by today! If you aren't here because of the MB's Treasurista St. Patrick's Day Blog Hop, please stay and hop along with us. If you've arrived from my good friend Lina's Blog Sweet Nothing's Paper Co. then you are right on track! If not and you just happened to stumble upon me please go to Misty's Blog MB's Treasurista to start at the beginning.

Welcome to the MB's Treasurista St. Patrick's Day Blog Hop


Today I have made a card with the theme of St. Patrick's Day mixed with Love!  Here is the card in full and then I will show close ups and explain what I did to make the card!


So, I super love how this card turned out. I love that I threw in some yellow with the greens I used. I at first used all greens and I just wasn't feeling it! I used My Minds Eye Lost & Found 2 paper collection as my background sheet and just layered it on top of a green card base. 


To make the clovers I used two different sized heart punches and the inked the edges with vintage photo distress ink. I then used my sewing machine to sew the center of the hearts just to add some texture. This was the first time I've used a sewing machine on any of my projects. I only used it a small amount and its pretty subtle but I like the look it gives. What do you think? I then adhered a small button to the center and used some bakers twine as stems for the clovers. 


Moving down to the lower left had corner. Lots of MB's Treasuista products here. First the flower collection in the corner contains two I Am Roses flowers, a rolled scallop flower from MFT and then a new small green acrylic flower. I really like the new colors. Check them out HERE! Also, notice the cream acrylic wheat spray... nice huh? I then used the new burlap trim from MBT and layered on some half back pearls. I really like the more natural look of this card. 


The "LUCKY" is stamped using a Technique Tuesday "Just My Type" stamp set. I then fussy cut around them. I stamped them on a piece of green patterned cardstock from MME. 


The inside I left pretty simple. I just layered on some kraft cardstock and used the Sweet Stack die from MFT to and used a stamp from the Unity Stamps set titled "You & Me".

Please make sure to leave comments and to follow all the blogs as there is alot of blog candy to be won and of course there is a Grand Prize:

$20 gift certificate to the MB's Treasurista store!!!


*Must "like" the MBT Facebook page-FACEBOOK
*Must be a MBT blog follower and comment on the hop post -BLOG


I hope you LOVED my project! Please leave me a comment to tell me what you think! Next up is the ever so talented Liz at Decade of Scrap! Please go show her some love. Here is the entire line-up in case you get lost! :)


MBT St. Patrick's Day Blog Hop Sneak Peek!

Please join MB's Treasuristas Design Team tomorrow in our St. Patrick's Day blog hop! It's sure to be a great time seeing some of Misty's NEW products being used on lots of amazing projects! Here is a sneak peek of what I have to share with you!!!


Come back tomorrow to see the full project!!

XoXo,

Katie

Tuesday, February 7, 2012

Teach Me Tuesday

Hello and WELCOME to my first Teach Me Tuesday Tutorial! I am very excited to share this with you today. I have been anxiously waiting to show this tutorial.  So, we all know and LOVE Misty's Silver Mesh Bling from MB's Treasurista. Well, I was working on a card and I was thinking to myself that I wished I had it is other colors. I know they sell it in other colors but I needed it NOW! You all know how that is. ;) So, I put my thinking cap on and this is what I came up with. Here is the finished card I was working on and the tutorial is below! 


TUTORIAL TIME!!! 
Here are the supplies you will need:


~Any pair of scissors
~Q-Tips or any brand of cotton swabs
~Tim Holtz Alcohol Ink
~Silver Mesh Bling

(Do you see where I am going with this) ;)

Step 1: Take your scissors and cut out the length of silver mesh bling you are needing for your designated project.


Step 2: Take the TH Alcohol Ink and put a small dot onto the tip of the cotton swap. Because the cotton is super absorbent you will likey need another small dot depending on the shade of color you are trying to achieve as well as the length of silver mesh bling you have to dye. 


Step 3: Dab each "bling" section with the alcohol inked cotton swab. Just use a pouncing method for this step. And keep repeating this until you have achieved the desired look and color. 


Final Product: Custom "Silver Mesh Bling" to match any project! :) 


I hope you super loved my tutorial! Please let me know what you think! :)

XoXo,

Katie

Saturday, February 4, 2012

MB's Treasurista February Creative Challenge


Each month the MB's Treasurista DT will be participating in a Creative Challenge. This months challenge was to create a love/romance/valentines day project WITHOUT using red or pink of any form! WHAT?!?!? No red or pink on a LOVE card! Crazy I tell you!


I am so super excited to announce that the MB's Treasurista design team is hosting our very first creative challenge over at the MB's Treasurista blog. So be sure to click on over for the details and how to participate. You won't want to miss out on your chance to win an amazing package of MBT Treasures, so head over there NOW!

Here's an overview of the rules: Detailed rules on the MBT Blog
Must Be the love/valentine/romance theme 
Challenge is not to use pink or red 
1 Entry submission per contestant Submit
 Project as a "linky" to the MB's Treasurista Creative Challenge post 
Follow the MBT blog 1 Winner will be selected 
Projects must be uploaded by February 18th 11:59pm and must be new! 


For some inspiration, I created a card!!! 

Well, I racked my brain for several days trying to figure out what I was going to make. How am I not going to use red or pink? I was laying in bed trying to fall asleep (which is oddly where a lot of my best ideas come to me) and I figured it out! This is what I have created:


I created a small envelope using kraft cardstock. I scored and folded it. Once it was folded I used my Corner Chomper to create rounded edges for the card and edged it with Vintage Photo Distress Ink. I used three different size heart punches and cut out several hearts. Some were cut from different colored cardstock but my favorite is the map I used. I adhered the hearts in the envelope in different directions to give it some dimension. I used the brown and white twine from MB's Treaurista and adhered a button with a twine bow. The bottom of the card displays a brown ruffled satin trim from MB's Treasurista. I LOVE THIS STUFF! It is just so super gorgeous! The base of the card in kraft cardstock layered with map paper and then a smoke blue cardstock. Here is what the inside looks like:


I used the My Favorite Things Layered Label Die to cut out different colors of cardstock. I used two different sentiments from MFT to create my own that was fitting for the card. Both the sentiments were from Pure innocence stamp sets. The first which originally read "Sending Smiles Across the Miles" is from Plane Amazing and the other originally read "Sending Butterfly Kisses" from the Butterfly Kisses set. I just stamped part from the first removing the work smiles and replacing it with kisses. The bottom is layered with a border punch and a piece of Chinese braid in chocolate brown from MB's Treasurista. Here is a closer look at the sentiment:


I hope you enjoy my creation! Let me know what you think and be sure to visit the other ladies! :)


XoXo,

Katie